How to Build Your First Robot Tutorial
Motivation | Costs | Parts | Batteries | Circuits | Sensors | Chassis | Tips
If you would like to see a step-by-step robot tutorial, visit my The $50 Robot Tutorial after reading this page.
Motivation is key to success.
Why build a robot? What are your motivations? Do they look cool? Want to join a robotics contest such as battlebots? Robotics can teach you so much. You will learn skills ranging from electronics, mechanics, controls, programming, and even as broad as understanding animal behavior and human psychology. It is best before starting this robot tutorial to ask yourself what your goals of creating a robot are, and what are your motivations - otherwise you may quit halfway not quite knowing why you started.
Ok now that you know why you want to build a robot, lets talk about what you need to know . . .
The first robot is always the hardest.
So take the KISS approach: Keep It Simple, Stupid! This is good advice as my own first robot I aimed too high, wasted a lot of money, and it never really worked. While making your very first robot your goals should be to just learn all the basics: how to program, how to use the tools, terminology, learn basic technology, and how to get robot parts super cheap. Save that cool robot idea you have for your second robot. You can always scrap the first for parts to build the second later. Trust me.

Ok I am ready, what do I need to start?
Obviously the first is MONEY. Robots can get expensive. A skilled roboticist can build a robot for next to nothing ($50, for example). He would often have collected enough stuff over the years that he would not have to go and buy most parts. He also would know how to build his parts instead of buying them pre-made, as well as have the skills to improvise. However the beginner does not have these options. You can make most of your robot out of parts in your house, but don't expect to make your first robot McGyver style with just rubber bands and toothpicks. Expect to spend good money for your first 2 or 3 robots. About $100-$200 minimum on your first robot. Ask your parents for it, tell them its educational or something. Tell them you can win money in contests to pay them back. Tell them it will help you get into your university of choice or get you that neat robotics internship. Tell them it will keep you off the streets or from doing drugs. Get a freakin job! You can also apply for grants at your school or university, and even ask companies for money. Tell them their donation gives them tax breaks or something. I have raised $4k+ for all my robots together. I even know one guy who got a $20k donation for a single robot!
Your future robots will become more affordable as you become more skilled and have more useful parts around your place. That is another thing, find a place to build your robot. Join a robotics club. Often members will loan you parts, tools, equipment, and that ever priceless help and advice you will need. I remember asking a half dozen people for help before even starting my first robot. You should also read my tutorial on how to pay for robots.
Ok I got my bling money, now lets spend it!
But first you need a design.
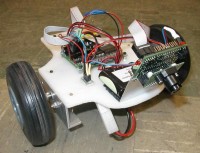
What does an easy to make robot look like? May seem like a dumb question, but I promise a good look at other robots will really help you. Browse the web for robot galleries. Remember, only bother looking at the really simple robots, DO NOT get imaginative or creative on your first robot. You're only asking for trouble if you want to make something like a biped with camera vision and an arm to get you a beer. What you want is a dumb little 2 wheeled thing that just barely doesn't commit suicide by driving off your table. And for a beginner, that can be extremely hard in itself.
So your first robot will have 2 wheels. It will drive under the most basic algorithm for a robot - differential drive.
|
to turn left the left wheel moves in reverse and the right wheel moves forward to turn right the right wheel moves in reverse and the left wheel moves forward |
Let's start with the wheels. Big wheels will let your robot move faster. Small wheels for slower. So why not just get big? Bigger wheels means your robot has less torque to carry a heavy payload, and bigger wheels generally mean fine position control is harder too. Also, your sensors often cannot keep up with fast changes in position. But then again, slow robots that take forever to commit suicide (such as ramming into a wall) are boring, so its a design tradeoff for you to decide. I recommend 2-3" diameter wheel for your first robot. Visit hobby aircraft websites or our robot parts list to find good wheels with traction. Expect to spend from $5-$10 plus shipping. Don't forget to consider how to attach your wheels to your motors.
Ok now the motors. For an optimal robot choosing motors would involve calculations of weight, gearing ratios, desired terrain, desired velocity and acceleration, voltage, power consumption, controllability and a whole range of things too overwhelming for a beginner. So just wing it. Just make sure you keep your robot as light as possible, and get motors that can do overkill. But remember, bigger the motors, shorter your battery life, and more expensive and complicated your motor control circuitry will get.
- My recommendations for your first robot motors:
Voltage: 5V-8V
Torque: double what you think you will need
There are many websites selling DC motors. Also considering buying servos. Both are equally as complicated to implement and cost about the same. Each have their own advantages. Servos are much easier to control, but they generally are less energy efficient, have explicit voltage requirements, and are less intuitive. Motors can take rough treatment and are efficient and powerful, but forget intelligent control cause it ain't happening. Expect to spend from $1-$40 per motor/servo. I recommend staying between $8-$20 each for your first robot.
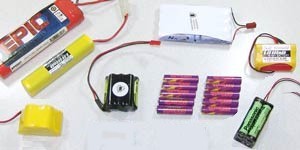
Next comes power. No, solar power and eating slugs wont work. Use a battery. When buying a battery make sure they are rechargeable, have high mAh (energy capacity), and can output at least an amp at any time. Consider putting batteries in both parallel and in series to vary/control total voltage and mAh.
There are many types of batteries, so lets just talk about the 3 most common.
Alkaline batteries are the most common, easiest to get, and cheapest too. However they are useless, don't buy them. They have low power capacities, are heavy, have trouble supplying large amounts of current in short time periods, and get expensive to constantly replace.
NiMH (Nickel Metal Hydride) batteries are really neat. Cell phone batteries are often NiMH (the industry is moving to Lithium). You can recharge them as much as you want, they have good current output, and have the highest energy capacity. However they are more expensive than the other two batteries I will talk about. I would recommend them for small size robots and for powering circuits. Note, NiMH batteries usually take like 5-10 hours to fully recharge depending on various factors.
NiCad (Nickel Cadmium) batteries are good for small to medium size range robots. They have the highest current output, are more affordable than NiMH's, and can be recharged within one or two hours. Older cell phone batteries were often NiCad. However, recharging NiCad batteries is a black art. Ever notice how some older cell phone batteries just do not last as long on a single charge as when you first bought it? This is called memory effect. A NiCad, over many charges, can only store less and less energy after each recharge. To prevent memory effect, whenever you wish to recharge your NiCad, you must first fully discharge it. Just hook up both battery leads to a cute kitten until it stops moving. I guess a motor would work too . . . And remember, NiCad batteries contain toxic cadmium stuff, so save a squirrel and recycle/dispose of it properly.
- My recommendation is to make a small sized robot and buy 2 NiMH 6V battery packs. Each about $10-$15 plus shipping. Get two so you can isolate motor power from circuitry power. As a beginner you do not want your motors interfering with or even melting your sensitive circuitry. Trust me. One battery for motors, and one for circuits. A NiMH will be fine for circuits, and either NiCad or NiMH for motors, depending on expected power requirements from your motors. Your choice. You can easily find batteries at RadioShack or any RC hobby website.
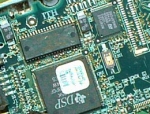
Ok now you need a cool circuit thingy. Forget about designing your own. It is best your first robot be simple, so a ready made circuit thingy is easiest. They are usually called microcontrollers, the most popular being PIC, Atmel/AVR, ARM, and BASIC Stamp based. Stamps are easier but offer less functionality. If you know programming basics, I recommend going AVR based. Google for microcontrollers online or go to our robot parts list. I personally use the Cerebellum Microcontroller, but there are many out there, and many more coming out lately. Expect to spend about $80-$120 on a controller at any robotics specialty website, another ~$30 on a programmer (uploads your program from your computer to the chip), and for PIC's expect to spend from free to about $600 on special compiling software. Some controllers have built in programmers, which is why I used the Cerebellum. You can also handmake the programmer really cheap. Just make sure the controller you buy has a built in motor driver, LED's, and many analog input/output ports.
Don't worry what those things are now, just make sure it has them. Most will. Consider power requirements too. They should also come with a manual and sample programs to explain how to use them. So I won't. They may look really complicated, but in actuality are quite simple plug and play devices. Just literally plug in your battery, your motors/servos, and your sensor input/outputs, program it, and wallah! Your circuit thingy is finished! When buying your first controller, have ease of use in mind. Do you honestly know what all those additional features are for anyway? Your first robot should be about learning how to build a robot, not how to make a neat robot.
Ok so how do I make my robot well um . . . robot? A battlebot is not really a robot in that it has no sensors and can't make it's own decisions, you want it autonomous riiiight??? You can however skip this section and use a RC remote attached to your controller if you want a battlebot. But autonomous robots will help you get the ladies.
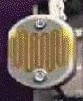
So lets learn about a basic sensor:
|
|
| Ok now you got all this stuff, but still no robot. Now it is time to DESIGN, THEN BUILD, a robot chassis. The reason why I say design first is because planning things is generally always a good idea. Through experience I have found that for every hour I spend on design is one less hour I spend on construction (and usually low quality construction at that!). A beginner may have difficulty designing just because he/she wouldn't know what does/doesn't work. But I still recommend it. When I first started building robots, my time spent was about 5% designing. Now, a few years later as I am older and wiser, I spend about 90% of my robot building time in the design phase. My robots now are so well designed that the day I receive in the mail all my robot parts, within just a day or two, and sometimes even within just a few hours, I can have a fully constructed robot. Why so fast? Because I use a 3D CAD program that shows placement of all parts, screws, everything. Parts were intentionally designed to require the least amount of drilling and cutting effort. I even calculate expected forces and power requirements of everything to make sure it is all up to spec. Do you want to spend hours building something and in the end say, "crap it didn't work"? | 
|
Now that you are ready to build your own robot, visit my The $50 Robot Tutorial for step-by-step instructions!
Other tips:
- Don't reinvent the wheel! Search the web for how other people did things, and copy them! It may be unoriginal, but hey it is your first robot, don't expect to develop the theory of relativity on your first try.
- Join a local robotics club. They have all the equipment and advice you will need. They also make a great support group. Perhaps you can even find a partner to build a robot together with (and split the costs with)?
- Join a robot competition. This will give you motivation, a design goal, and a deadline to finish your robot. Plus if you win $, your robot pays for itself. Just don't wait till 2 weeks before the competition to start! Also do not plan to win your first time unless you have FINISHED your robot a month before the competition. That way you have a lot of time to tweak and improve. Redesign your first robot after learning from your mistakes and enter again the next time.
- Buying parts is a skill. Finding them and making sure they are up to spec and affordable can be a challenge. Remember, many suppliers offer free samples of sensors and IC's to 'your company,' hint hint. Use our robot parts list to help get you started. Finally, the google ads on the top right of this site should also show robot parts suppliers.
- As the size of a robot increases linearly, the cost and difficulty to make it increases exponentially. Make it as small and light as possible.
- Most importantly, remember to KISS. Keep it simple, stupid!
Tidak ada komentar:
Posting Komentar